Technology
GoPro Hero 12 Black Review

GoPro Hero 12 Black review
GoPro Hero 12 Black Review: As someone who loves using action cameras, I was really excited about the new GoPro launch in 2023. There were rumors about amazing features like a 1-inch sensor or 4K video at 240 frames per second, which got me super hyped.
But the actual release turned out to be a bit less flashy than what was rumored. Trying out the new camera, I realized that while some of these upgrades might not seem huge, they actually do make a difference. However, I’m wondering if these changes are enough to justify upgrading to the new model. Here are my thoughts about it.
Pros and cons of GoPro Hero 12 Black
The latest GoPro Hero 12 Black is slightly better than previous versions, thanks to several small updates. However, the changes are not drastic, so if you already own the Hero 11, you might not find it necessary to upgrade. But if you’re new to GoPro or have an older model, the Hero 12 Black is definitely a good choice.
Pros
- Much better menu system
- Improved battery life
- GP Log & Timecode Synchronization
- Built-in tripod thread
- Can be paired with Bluetooth headphones
Cons
- No built-in GPS
- Minor changes from its predecessor
Design
- Weight: 154g
- Waterproof up to 10m / 33ft
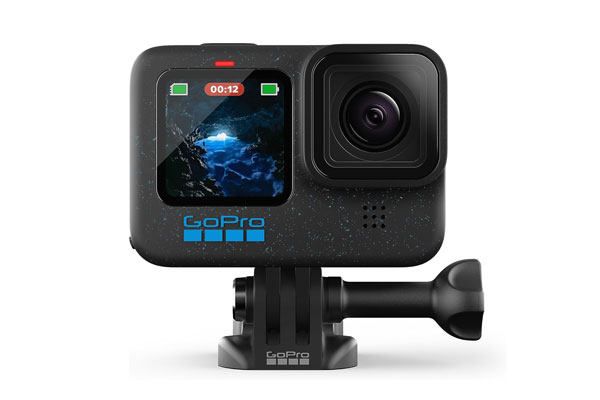
- Built-in 1/4-20 tripod thread, new speckled finish.
The GoPro Hero 12 Black maintains the familiar design seen in the recent GoPro models, starting from the Hero 9 Black. However, this time, there’s a noticeable change in the appearance with a spotted finish on the rubber surface, giving it a unique look compared to the previous uniform dark gray/black finish.
Despite some rumors suggesting a change in the display size and bezels, the Hero 12 retains the same screen size and layout as its predecessors. While both front and back displays work well, the relatively large asymmetrical bezels on the back may start to seem a bit outdated.
I had hoped GoPro might take a cue from DJI and include a front touchscreen display, which I found very convenient on the DJI Action 4. Once you get used to it, you’ll likely find yourself reaching for the GoPro’s display only to remember it’s not there. Maybe it’ll be a feature in the next version.
However, there’s a new addition to the Hero 12’s body: a 1/4-20 tripod mounting thread positioned between the regular folding mounting brackets. It might seem small, but it’s quite handy as it allows you to attach your GoPro to almost any camera accessory available, eliminating the need for an adapter. This addition is very practical and useful.
Software & Features
- Improved Menu System
- Bluetooth microphone support
- Timecode synchronization
After using the GoPro Hero 12 Black for a while, I’m most excited about the revamped menu system. GoPro’s menus used to be a bit confusing, requiring you to navigate through a set of presets to change settings, which could be frustrating, especially if you were accustomed to more straightforward setups with other camera brands like Insta360 or DJI.
But now, things have improved a lot: GoPro’s menu system makes much more sense, making it quicker and easier to adjust settings and start shooting. You can still use presets if you prefer, but now they’re optional, not mandatory.
There’s also a light mode for users who might find advanced settings a bit overwhelming. This mode simplifies the menu, making it easier to use. Moreover, the Easy Mode has been enhanced, and GoPro has added options for shooting in vertical and full-frame 8:7 modes, which were previously limited to 16:9. These improvements make shooting in different modes more accessible and user-friendly.
The GoPro Hero 12 Black introduces some cool enhancements in its slow-motion modes, especially with the ability to record in an 8:7 aspect ratio. This lets you capture footage in various formats (vertical, square, or horizontal) and later adjust the framing as needed. This is particularly useful for features like Star Trail and Light Painting, which haven’t been fully explored yet. Now, it’s simpler to edit and share these clips on platforms like Instagram Reels or TikTok.
Another exciting addition is the Hero 12’s capability to pair with wireless Bluetooth headphones and microphones. This allows for various creative recording setups, such as capturing audio commentary or reactions separately while recording video. However, the downside is that the audio quality isn’t top-notch, resembling the quality of a phone call rather than a professional wireless microphone like the Rode Wireless Go II.
Furthermore, the Hero 12 introduces wireless timecode synchronization for multiple GoPro cameras. This might not be a widely used feature, but it’s handy for professional users handling multiple cameras on set. It simplifies the process of coordinating timecodes across various cameras, making post-production work much more manageable.
Photos and videos of the performance
- Up to 5.3K60/4K120 in 10-bit color
- New HDR Video Mode and GP Log Profile.
- HyperAnti-Aliasing 6.0
The GoPro Hero 12 Black retains the same sensor, processor, resolutions, and frame rates as its predecessor, resulting in very similar footage in most situations. However, enhancements have been made to the camera’s stabilization technology. With HyperSmooth 6.0, the camera now analyzes four times more data to ensure smoother performance, especially with the AutoBoost feature.
Though improvements have been made, the differences might be hard to spot. The Hero 11 Black already boasted one of the best stabilizations in the industry, and the Hero 12’s stabilization is equally impressive. With AutoBoost activated, there might be slight alterations, like a wider viewing angle and smoother transitions, but it’s not a groundbreaking change.
The GoPro Hero 12 Black now offers HDR video recording, designed to capture more details in high-contrast scenes with shadows and highlights. Despite this enhancement, I found the difference in dynamic range to be subtle. While it might be useful in scenes with strong backlighting, the mode limits the resolution to 5.3K30/4K60 and disables HyperView in 5.3K, so I might not use it frequently.
However, the inclusion of GP Log is a significant addition. This flat and adaptable profile, a first for GoPro, provides extra flexibility for users who prefer customizing colors in their footage or utilizing LUTs for a particular look.
GoPro released the Max Lens Mod 2.0 alongside the Hero 12 Black, a significant upgrade from its predecessor. This optional add-on, priced at around $100 (with bundle options available), is an essential accessory for this generation.
The Max Lens Mod is essentially an Ultra-Wide Angle Lens Adapter that replaces the standard GoPro lens protector. Once attached, the camera uses software enhancements to maximize its potential, such as providing stabilized footage with a wider field of view, locked to the horizon.
This second iteration of the accessory is notable for a few reasons: it’s physically smaller, lighter, and offers double the scratch resistance compared to the original. But what’s most exciting is the incredibly wide viewing angle. Leveraging the 8:7 sensor, the Max Lens Mod 2.0 now offers Max HyperView with an impressive 177-degree viewing angle at resolutions up to 4K60 (compared to the original maximum of 2.7K60).
For those capturing a lot of point-of-view shots, especially with a chest mount, this add-on is a game-changer. It amplifies the sense of speed and grandeur, allowing you to capture even more within the frame. Additionally, it’s fantastic for vertical shots using the new vertical shooting mode, providing a wide enough perspective to encapsulate unique angles and create distinctive content.
Battery life of GoPro Hero 12
The GoPro Hero 12 Black boasts improved battery life and reduced chances of overheating compared to its predecessor, the Hero 11. According to GoPro’s claims, here’s an estimate of the continuous recording times with HyperSmooth 6.0 enabled at various resolutions:
About 70 minutes of continuous recording at 5.3K60 resolution.
Around 58 minutes of continuous recording at 4K120 resolution.
Over 90 minutes of continuous recording at 5.3K30 resolution.
More than 155 minutes of continuous recording at 1080p30 resolution.
Although the Hero 12 uses the same 1720mAh Enduro battery as the Hero 11, GoPro claims it lasts twice as long. In real-world scenarios, the actual battery life may vary based on the settings you select.
However, across the board, there’s a noticeable improvement in battery life, and the camera is less prone to overheating. Even during hot weather in the UK, the camera didn’t come close to overheating when shooting at high settings in direct sunlight. As the temperatures dropped, concerns about overheating were hardly a consideration.
The GoPro Hero 12 Black’s enhanced battery life and reduced risk of overheating come at a cost. GoPro opted to remove the built-in GPS module found in previous models, stating that most users don’t utilize features like the speedometer, altimeter, and route stickers associated with GPS functionality. While this decision benefits battery life and temperature management, it might disappoint users, like me, who occasionally use those GPS features.
At present, there’s no way to activate GPS functions on the Hero 12. There might be a possibility of a future accessory, similar to DJI’s recent release, that enables GPS features. For now, individuals who rely on GPS functionalities may find the Hero 11 more suitable until a solution is provided for the Hero 12.
Conclusion for GoPro Hero 12 Black Review
Despite being a somewhat underwhelming update, I still find the GoPro Hero 12 Black to be a camera I appreciate. The previous Hero 11 Black was already my preferred action camera, and the thoughtful small enhancements in this version significantly impact its usability.
For me, the most significant improvement lies in the revamped menu system, which is much more user-friendly. Having a tripod thread, a flatter log profile, and the ability to shoot timelapses in 8:7 are also standout updates. I found the Max Lens Mod 2.0 particularly impressive, although it’s unfortunate that it’s an extra expense. Yet, if you’re a fan of shooting with an ultra-wide-angle lens, it’s worth considering.
Other features like Timecode Sync and Bluetooth headphone pairing, while cool, might only cater to a niche audience. Likewise, the updates to HDR mode and HyperSmooth stabilization seem rather minor. This might not entice existing Hero 11 owners to upgrade, but for those who’ve missed a few iterations, the Hero 12 Black presents a substantial leap forward.
Share your thoughts in our comments section regarding GoPro Hero 12 Black Review.
Technology
How to Clear the RAM on iPhone in seconds

How to Clear the RAM on iPhone in seconds
A Quick Guide on How to Clear RAM on iPhone in Seconds :
For iPhone users, ensuring optimal performance is paramount to a seamless user experience. One effective way to achieve this is by freeing up space in the Random Access Memory (RAM), where the device temporarily stores data needed for running applications.
When the RAM is cluttered, your iPhone may experience sluggishness, longer loading times, and even unexpected app closures. In this guide, we’ll explore the simple yet powerful method of clearing RAM on your iPhone to enhance its performance in just a few seconds.
Understanding the Importance of Clearing RAM:
Random Access Memory (RAM) is a crucial component that allows your iPhone to quickly access and process data required by active applications. As you use various apps throughout the day, RAM gradually fills up. When it reaches capacity, your device may start to slow down as it struggles to access the necessary data.
Clearing RAM is akin to providing a breath of fresh air to your iPhone, ensuring it can efficiently handle new tasks, resulting in improved speed and responsiveness.
Quick Reset for Different iPhone Models:
The easiest and most effective way to clear RAM on an iPhone involves performing a quick reset. The method varies slightly depending on the type of iPhone model you own. Follow these steps:
For iPhone Models with Face ID (iPhone X and newer):
- Press and hold the volume down button and the side button simultaneously.
- When the power off slider appears, drag it to the right to turn off your iPhone.
- Wait approximately 30 seconds and then turn the device back on.
For iPhone Models with Touch ID:
- Press and hold the side button until the slider appears.
- If you own the first-generation iPhone SE, press the top button instead.
- Slide to power off and wait for around 30 seconds before turning the device back on.
- By performing this quick reset, you allow your iPhone to clear out unnecessary data from the RAM, giving it a performance boost.
Additional Tips to Free Up RAM:
While the quick reset is a powerful method, there are other proactive steps you can take to optimize your iPhone’s performance and free up RAM:
Close Unused Applications:
Manually close apps that you’re not actively using, as open apps consume RAM resources.
Manage Notifications:
Turn off notifications for apps that aren’t essential. Unnecessary notifications can contribute to RAM usage.
Stay Updated:
Ensure your iPhone is running the latest version of iOS. Updates often include performance enhancements.
Monitor Storage Space:
Keep an eye on your device’s storage capacity. If it’s near capacity, consider deleting unnecessary files or apps.
Battery and Storage Check:
If your iPhone continues to exhibit slow performance, it may be time to check the battery health or free up additional storage space. Contact Apple support for further assistance.
Conclusion:
In just a matter of seconds, you can breathe new life into your iPhone by clearing its RAM. The quick reset method, coupled with proactive measures like closing unused apps and managing notifications, ensures that your device runs smoothly and efficiently.
By understanding the importance of RAM and regularly optimizing its usage, you can enjoy a responsive and high-performing iPhone. Incorporate these simple steps into your routine, and experience the difference in speed and responsiveness on your beloved device.
Technology
How to Share Wifi Password iPhone

How to Share Wifi Password iPhone
How to Share Wifi Password iPhone? Sharing WiFi Password on iPhone
The convenience of automatically connecting to WiFi at home adds a touch of comfort to our daily lives. Sharing this access with friends and guests is a hospitable gesture, making you the ultimate host.
However, it becomes a challenge when you want to connect someone to your WiFi, and either you don’t know the password or it’s too complex to remember. Fear not – sharing WiFi on iPhone to iPhone is a breeze, and we’ll guide you through the process.
Requirements for WiFi Sharing:
Before delving into the steps, let’s go through the essential requirements to seamlessly share WiFi between iPhones:
Both iPhones Need iOS 16 or iOS 17:
Ensure that both your iPhone and your friend’s iPhone are running the latest version of iOS, either iOS 16 or iOS 17. Staying up-to-date is key to accessing the latest features.
Unlocked and Connected iPhone:
Your iPhone must be unlocked and connected to the WiFi network you intend to share. This ensures a smooth sharing process.
Friend’s Contact Information:
Your friend should be listed as a contact in your address book, and their contact information must include the email associated with their Apple ID. This is crucial for the sharing mechanism to work seamlessly.
WiFi Sharing Steps:
Assuming all the prerequisites are met, follow these straightforward steps to share your WiFi password:
Unlock Your iPhone:
Make sure your iPhone is unlocked and connected to the WiFi network you wish to share.
Ask Your Friend to Connect:
Request your friend to go to Settings on their iPhone, navigate to the WiFi section, and select the desired network. At this point, their iPhone should prompt them for the WiFi password.
Share Password:
On your iPhone, a prompt will appear to share the WiFi password with your friend. Click on the ‘Share Password’ button. This initiates the sharing process via AirDrop, and your friend’s iPhone will automatically receive the password.
Connection Confirmation:
Once the password is shared, your friend’s iPhone will display a message confirming the connection. Your friend is now successfully connected to the same WiFi network without needing to know the password.
By following these steps, you’ve not only made the connection process seamless but also maintained the confidentiality of your WiFi password.
Alternative Method: Using a QR Code
In case your friend doesn’t use an iPhone or has an older iOS version, an alternative method involves creating a QR code to share your WiFi password. Here’s how:
Prepare a QR Code:
Visit the QiFi website from your iPhone, enter your WiFi network name and password, and click on the ‘Generate’ button. This generates a QR code representing your WiFi credentials.
Display QR Code to Friend:
When your friend needs to connect, show them the QR code on your iPhone. Regardless of their phone type, they can use their camera to scan the QR code. This automatically recognizes the WiFi credentials and connects them without manual password input.
Conclusion:
Sharing your WiFi password on iPhone has never been simpler. By keeping both iPhones updated, ensuring the proper settings, and following the steps outlined in this guide, you can effortlessly extend your hospitality to friends and guests.
Whether using the direct sharing method or the QR code alternative, the process is user-friendly and secures your WiFi network. Embrace the ease of sharing and enjoy a connected and hospitable environment for everyone.
Technology
How to Improve iPhone Battery Life with iOS 17

How to Improve iPhone Battery Life with iOS 17
How to Improve iPhone Battery Life :
One of the common grievances among iPhone users revolves around the device’s battery life. Many users find that their iPhones don’t hold a charge as well as other high-end smartphones. While the capacity of the phone’s components may contribute to this issue, there are adjustments and tricks within the iPhone settings that can help extend battery life.
In this detailed guide, we will explore various strategies for improving iPhone battery life, specifically focusing on iOS 17.
Optimizing Screen Features:
One of the prominent features impacting battery life is the always-on screen, particularly on newer devices. To address this, users can disable the always-on screen feature by navigating to Settings, selecting ‘Display and Brightness,’ and deactivating it.
This adjustment can significantly reduce battery drainage, especially for those who don’t find this feature essential.
Managing Screen Brightness:
Another factor affecting battery life is screen brightness. Excessive brightness can lead to faster battery depletion. To address this, ensure that the iPhone’s automatic screen brightness adjustment feature is activated. Users can access this setting by going to ‘Settings,’ selecting ‘Display and Brightness,’ and enabling the ‘Auto-Brightness’ option.
By allowing the phone to adjust brightness based on ambient lighting conditions, users can extend battery life considerably.
Addressing Haptic Feedback:
The haptic feedback of the keyboard, also known as the haptic keyboard, can contribute to unnecessary energy consumption. To conserve energy, users can disable this feature by accessing the iPhone settings. Navigate to ‘Settings,’ choose ‘Sounds and Vibrations,’ then proceed to ‘Keyboard Feedback.’ Here, users can disable the ‘Vibration’ option, minimizing the battery impact of haptic feedback.
Background App Refresh:
One significant feature that can drain battery life is Background App Refresh. While this feature ensures that apps are updated in the background, it can be a resource-intensive process. Users can manage Background App Refresh by going to ‘Settings,’ selecting ‘General,’ and choosing ‘Background App Refresh.’ Here, users can either disable the feature entirely or customize it for specific apps, optimizing battery performance.
App Notifications:
Constant app notifications can contribute to battery drain. Users can conserve battery life by managing app notifications. Navigate to ‘Settings,’ select ‘Notifications,’ and review and adjust notification settings for each app. Disabling unnecessary notifications can help minimize background activities and preserve battery power.
Location Services:
Location services, while useful, can significantly impact battery life. Users can manage location services by going to ‘Settings,’ selecting ‘Privacy,’ and choosing ‘Location Services.’ Here, users can either disable location services entirely or customize settings for individual apps. Turning off location services for non-essential apps can lead to substantial energy savings.
Updates and Background Activities:
Ensuring that the iPhone is running the latest iOS version is crucial for optimal battery performance. Apple frequently releases updates that include bug fixes and optimizations. Additionally, keeping apps updated can address potential performance issues that may impact battery life. Users can check for updates in ‘Settings’ under the ‘General’ section.
Manage Widgets:
Widgets on the iPhone’s home screen can provide quick access to information but may consume unnecessary power if not managed efficiently. Users can customize and remove widgets by entering ‘Edit Home Screen’ mode. Removing widgets that are not frequently used can contribute to improved battery efficiency.
Limit Background Processes:
iOS 17 provides users with the ability to limit the number of background processes running on the device. To manage this, go to ‘Settings,’ select ‘General,’ and choose ‘Background App Management.’ Here, users can set limitations on background processes, ensuring that only essential activities are running when the device is not in use.
Optimize Mail Settings:
Fetching emails frequently can contribute to battery drain. Users can optimize mail settings by going to ‘Settings,’ selecting ‘Mail,’ and choosing ‘Accounts.’ Here, users can adjust the frequency of mail fetching or switch to manual fetching for non-essential accounts, conserving battery power.
Conclusion:
Improving iPhone battery life with iOS 17 involves a combination of adjusting settings, managing features, and adopting efficient practices. By following the detailed tips outlined in this guide, users can optimize their iPhone’s battery performance and enjoy extended usage between charges.
Whether it’s fine-tuning screen settings, managing app activities, or staying up-to-date with software updates, these strategies empower users to make the most out of their iPhone’s battery life. Incorporate these practices into your routine, and experience a more efficient and long-lasting iPhone battery performance with iOS 17.
-

 Travel9 months ago
Best Spinning Rod for Bass 2024
-

 Technology9 months ago
Best Lure for Trout 2024
-

 Travel9 months ago
Best Hunting and Fishing Clothing 2024
-

 Travel9 months ago
Best Robot Vacuum Cleaners 2024
-

 Technology9 months ago
Best Floats for Night Fishing
-

 News6 months ago
Valentine’s Deals
-

 Technology9 months ago
Best Twisters for Fishing 2024
-

 Travel9 months ago
Best Spinning Fishing Reels for Bass 2024


